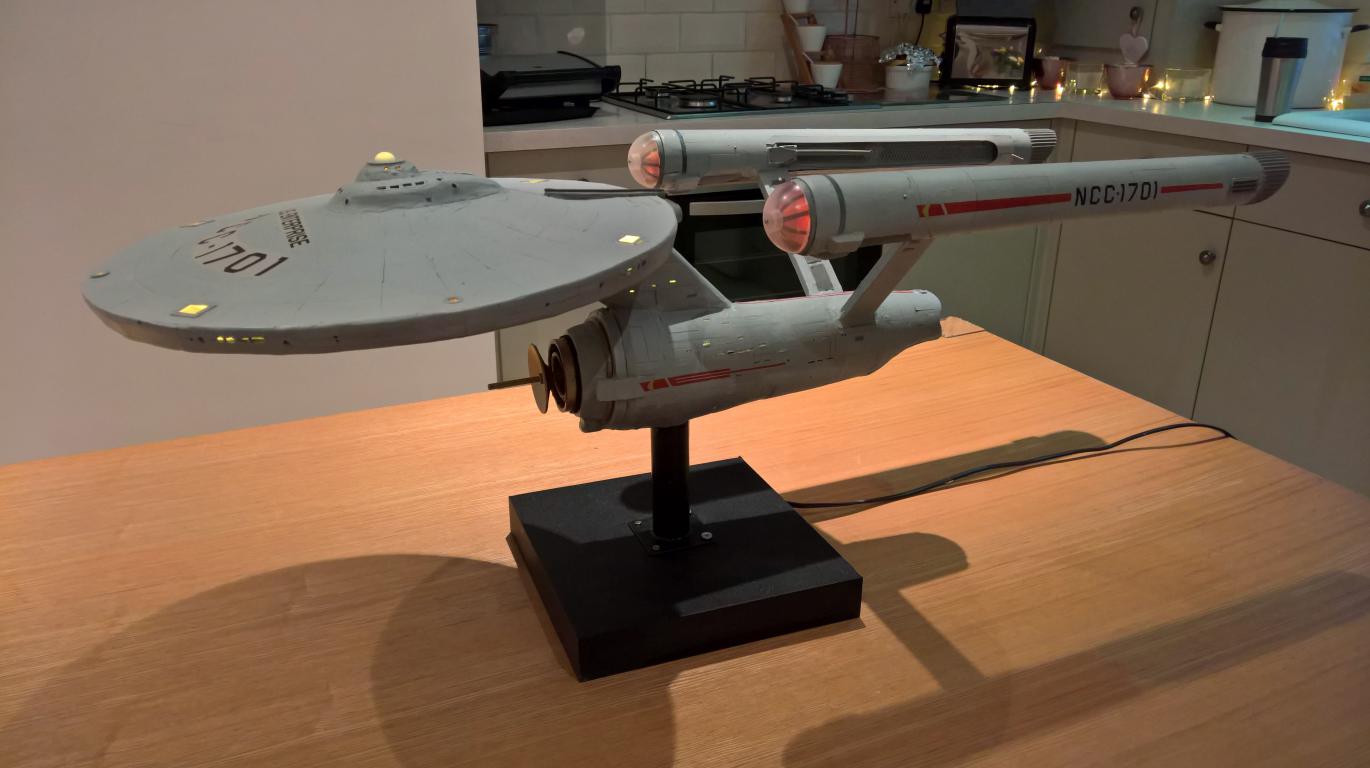
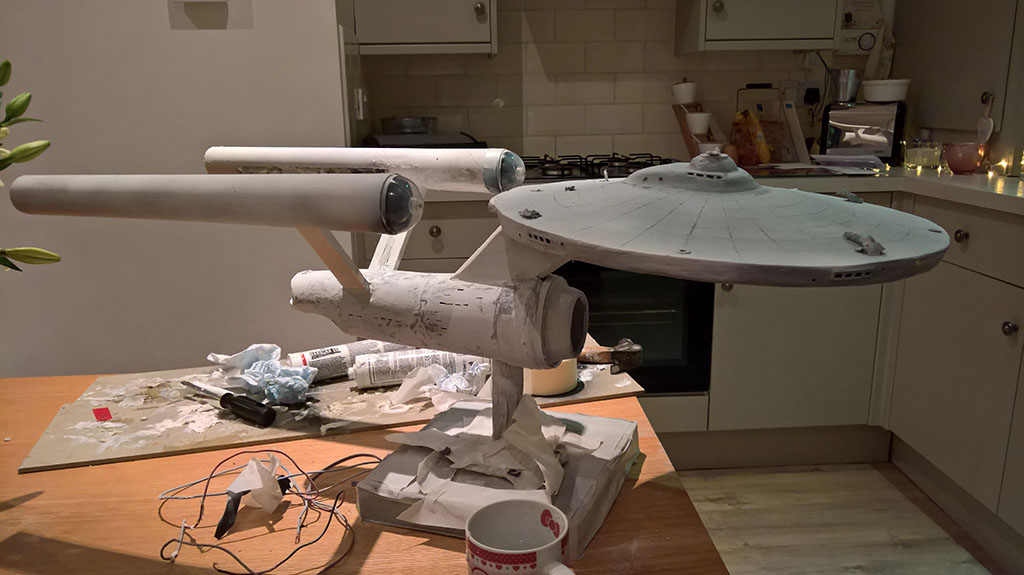
My most ambitious scratch build effort to date was the Original Series USS Enterprise model from the Star Trek series.
I’ve always been a huge fan of the series rom my youth and even recall owning a toy version of it in the 70’s. As a designed object, the USS Enterprise is definitely one of the most aesthetically pleasing creations ever made.
As with my previous X-Wing model, I sourced several schematics on the internet and made sure I tile printed them to the exact size needed. I had top, front and side view and always made sure I visually compared to make sure the scale was near enough.
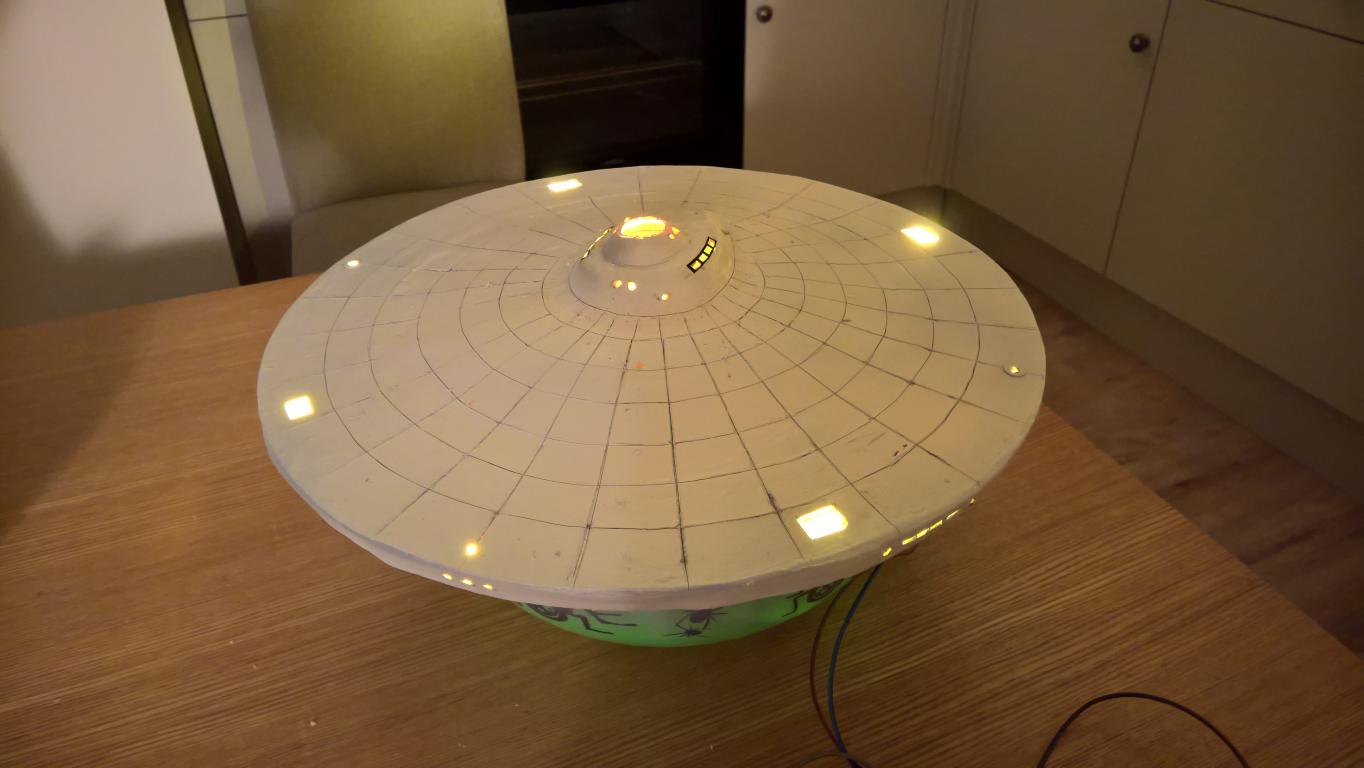
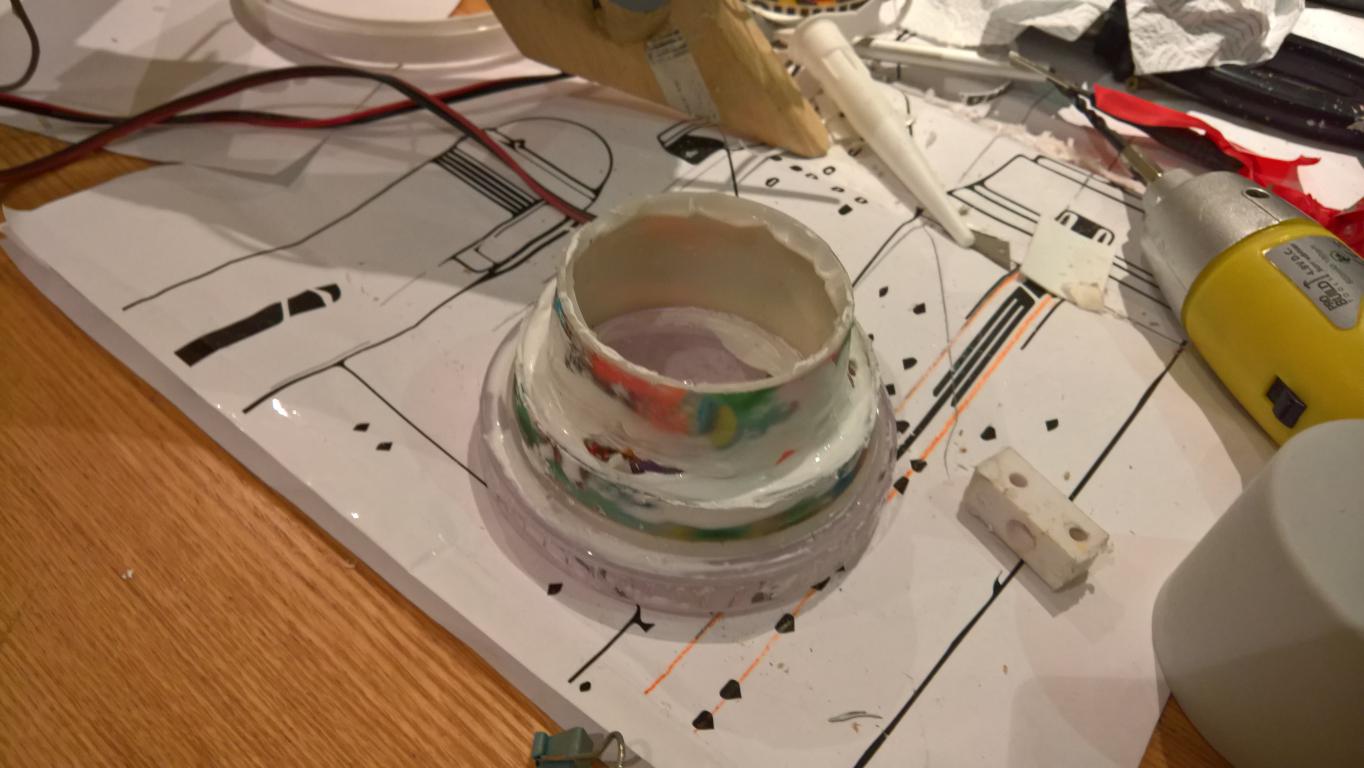
The biggest issue was the saucer section, which was always going to be awkward due to the shape and the size. It had to be lightweight, so I used foam filled card as the base. The shape of the top part left me a few sleepless nights, before seeing an online scratch build, where the chap built a structure like a rotating engine fan, with the shape of each “fan” matching the curvature part.
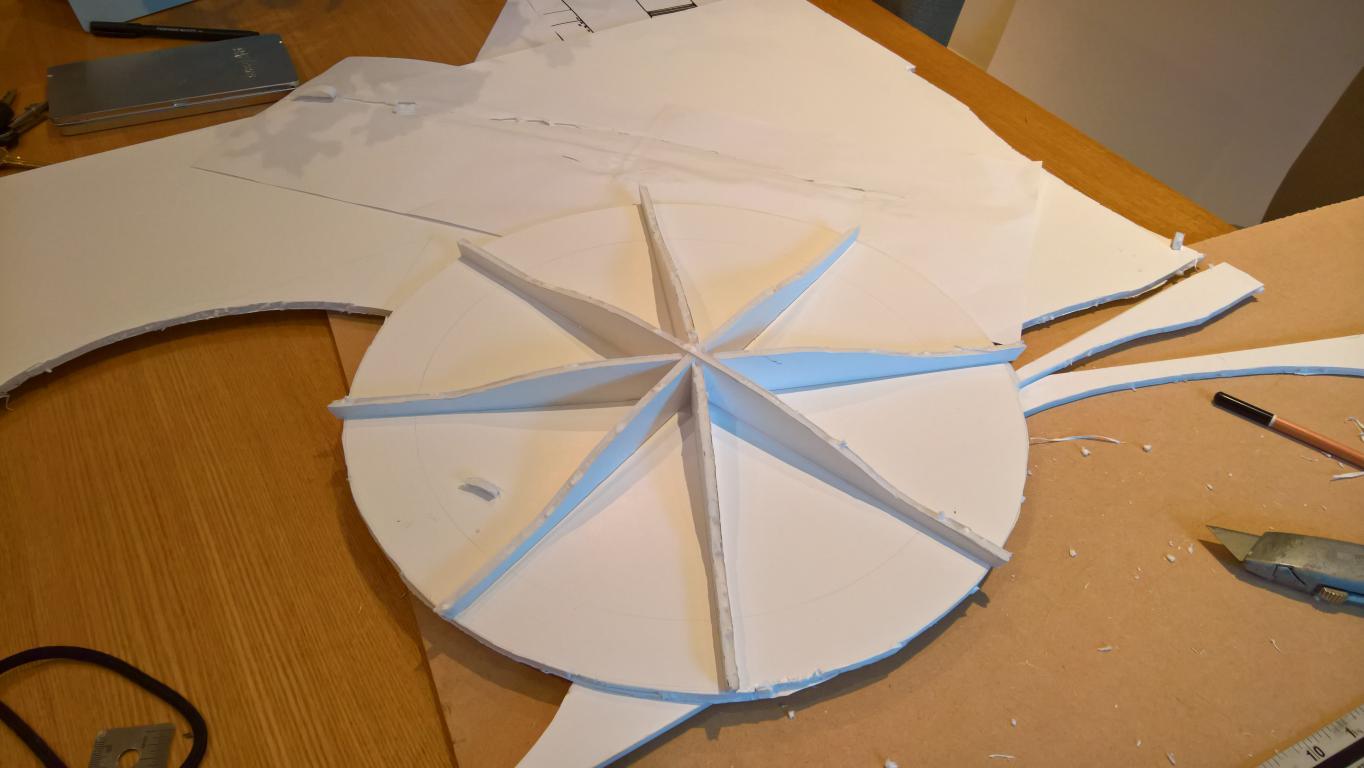
I cut a number of these out of the foam filled card and put them on symmetrically, using grab adhesive instead of normal glue to hold in.
Once done, I put in foam filler in the gaps to build it up. This was sanded and cut when it was dry, very similar to cutting the top of a cake while looking at it sidewards. The edge of the saucer was left open to allow lights to be thread through. For my previous Polar model, I used strip lights which were awkward, so this time I used single LEDs and wired them all together.
Once dry, I cut out the top panels on thick card and then glued and pinned into shape. They weren’t exact, but I had to build up the edges with stacked foam filled blocks. It was pinned in, which was important as I’d struggle to hold into place.
Once done, this was filled with decorators caulk, in the same way you’d ice a cake. I rubbed it lightly over the dome and sanded and repeated, before priming to get a good finish. I repeated this and remembered the technique of wetting the caulk or filler to get a better finish.
For the top edge of the saucer, I cut out a hoop in card and then cut neatly on the saucer using the inside of the hoop. The hoop was placed on and then filler was used to tidy the gaps before being sanded and primed and repaired.
In an ideal world, I wanted to have a thin outer saucer rim, which I could cut windows into. However, I couldn’t get a thin strip angled enough to go around the outside, so I built it up with strips like a pyramid and then smoothed it with filler. Subsequently, it was awkward to cut a clean window out. So, I gouged out a rectangle strip and then printed some windows in a set of 4; cut the windows out and glued the template to the side of the gap to create neat windows.
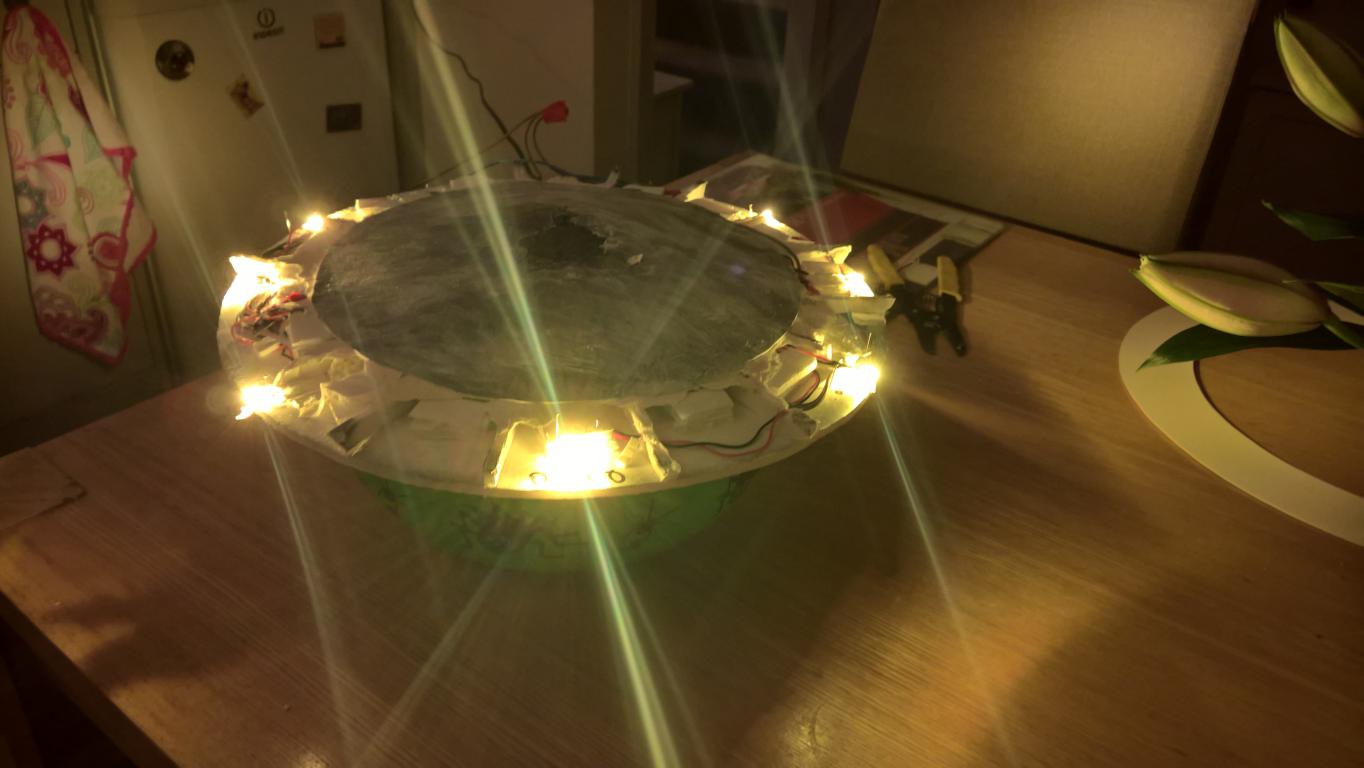
The circular under dome was awkward as it wasn’t entirely symmetrical. I measured using a model schematics and found a bowl the same size to create the lines. Again, I used slightly curved windows in sets of 5 to fit underneath. The other windows on the saucer were done using a small drill and neater holes. Any windows were blocked with tissues or matchsticks when spraying and priming. The bottom dome isn’t accurate as it’s a bit bigger than I really wanted it to be.
I was worried about the weight of the saucer, The foam filled saucer shape was at the bottom and built upwards, so I used a metal plate on the inside, with screw holes at the top and placed on to the l plate under.
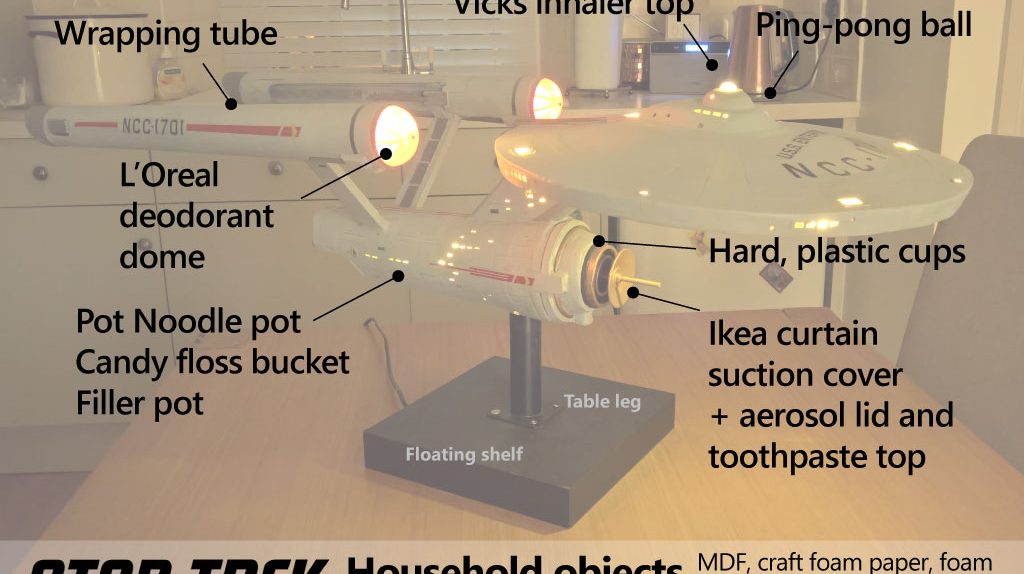
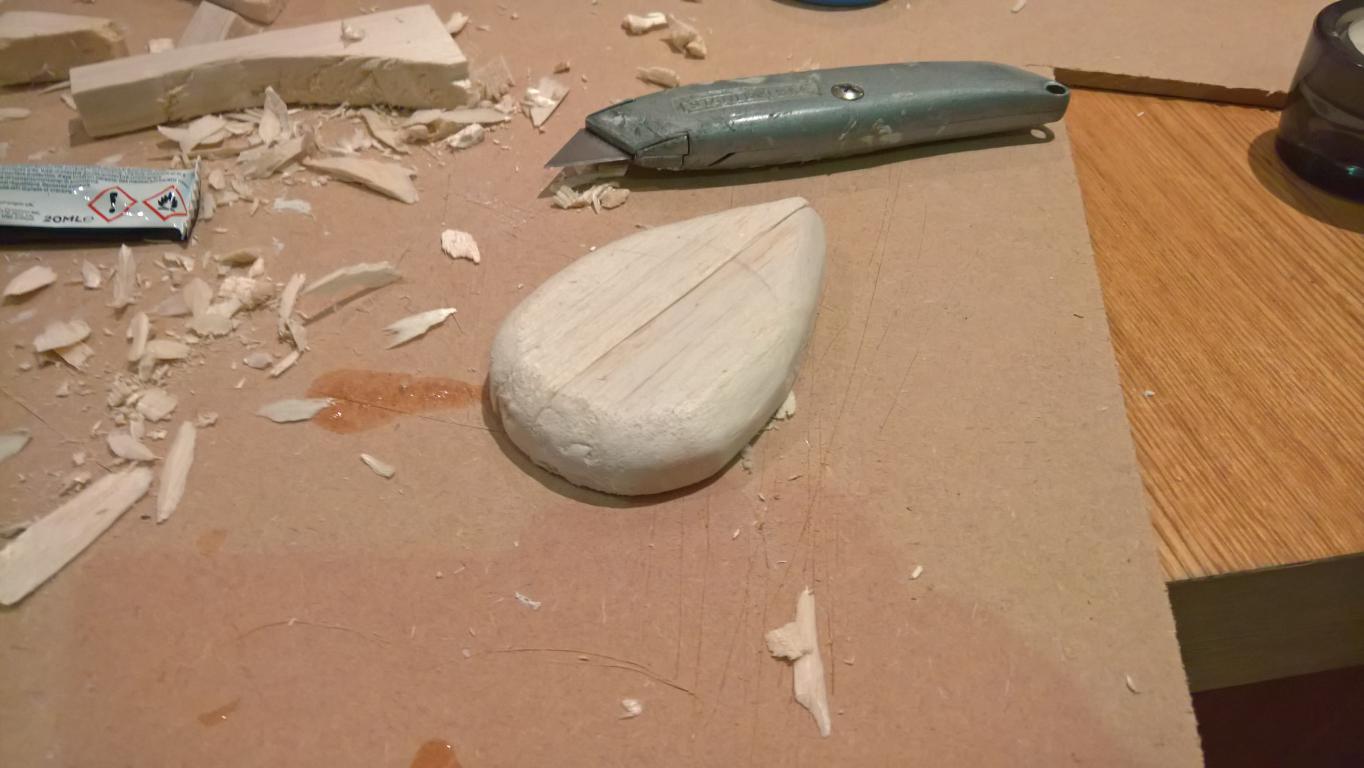
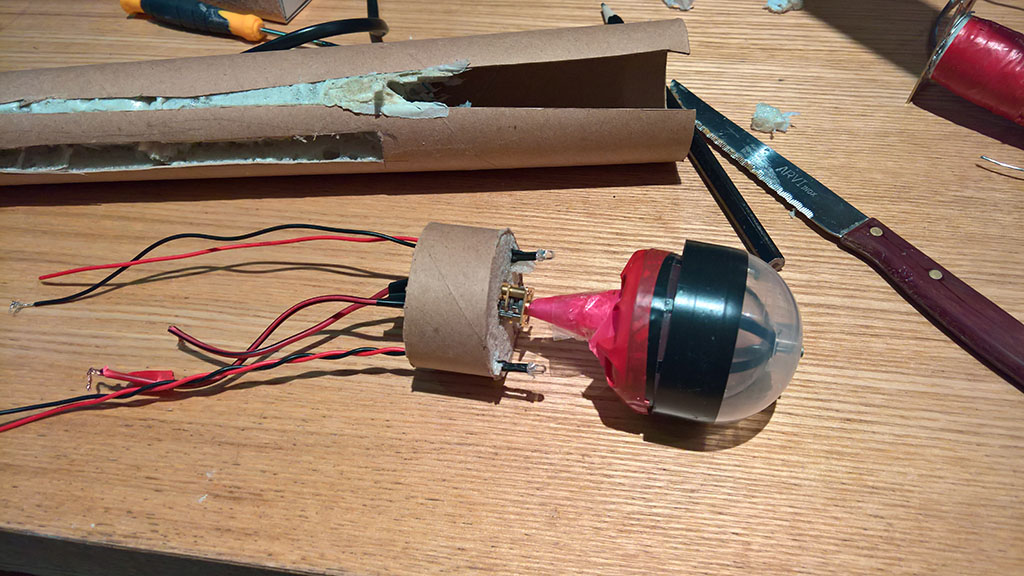
The bridge area was awkward. Again, a few sleepless nights before decided to use balsa wood, as it was easy to shape. It was cut out and then sanded and curved, before being hollowed out for the lighting. The top dome was created using a cut ping-pong ball and a cut Vicks Inhaler stick (same with the bottom). The inhaler was white, so the light glowed through with the desired effect.
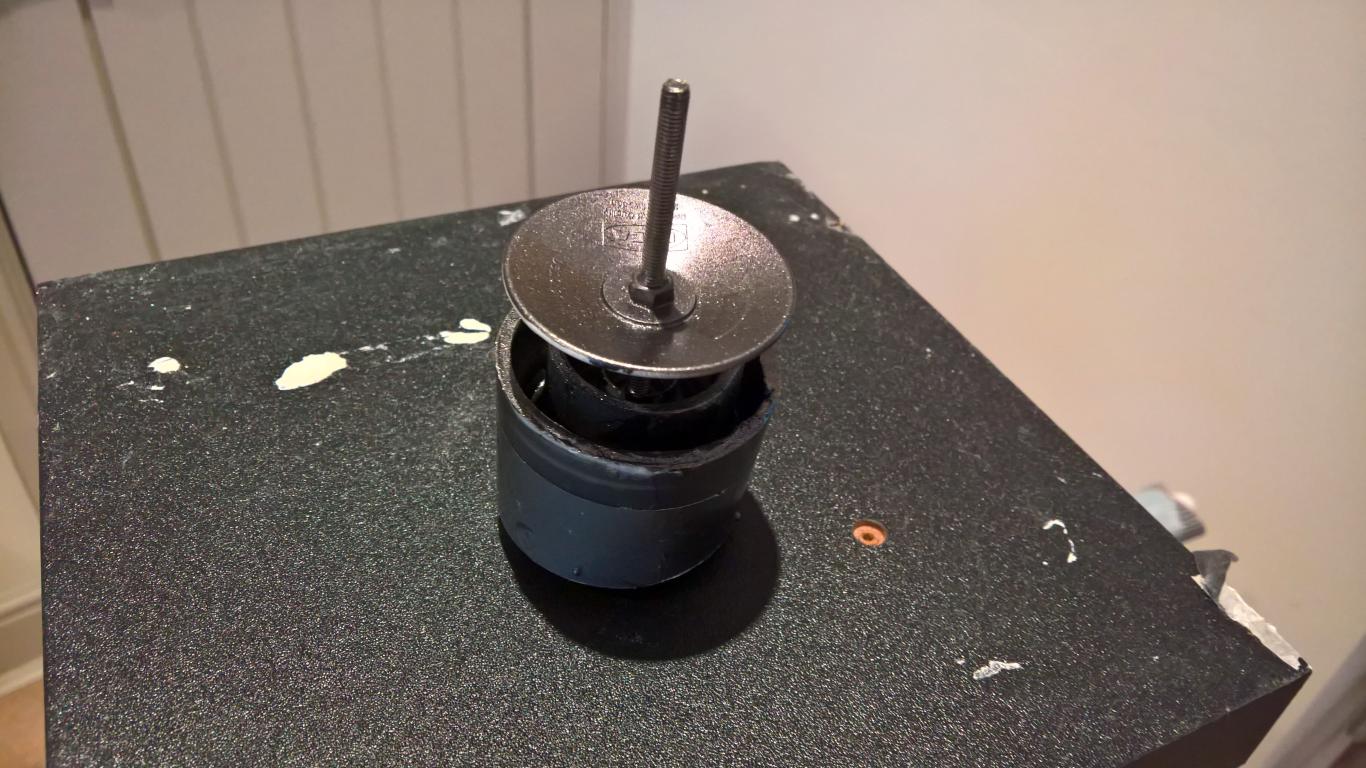
The saucer was lit using standard LED lights from eBay. I used Bloater079 on eBay who was really helpful, including advising on what motors I needed.
The top saucer had 7 lights fitted, with three either side and one at the head. Underneath there were three inside the circle. On the top, I drilled a hole from the bottom to thread through to under the balsa dome, where I would drill holes.
The power source is a regulated power unit, but the lowest power is 3v which is perfect for the lights. The lights are daisy chained to each other, with wiring threading through at the back, before it leads down the strut to the main body.
The strut from the main body to the saucer seems like a straightforward block, but with the lights needing to show through. Originally I used a few L shaped plates to create a strut, but it wasn’t study enough. I changed this to a wood block, which had two large holes drilled to allow for lighting.
The hull was a long piece of thick MDF, with the pipe stand under it. On it was the warp struts, which were wood, but channelled through in order to get the warp wires in. Ideally I needed some small 45 angle wood, but luckily, B&Q had some 45 degree plastic blocks to which I affixed the wood struts with liberal amounts of grab adhesive and tiny screws. It was exceptionally sturdy, so I was pleased in the structure.
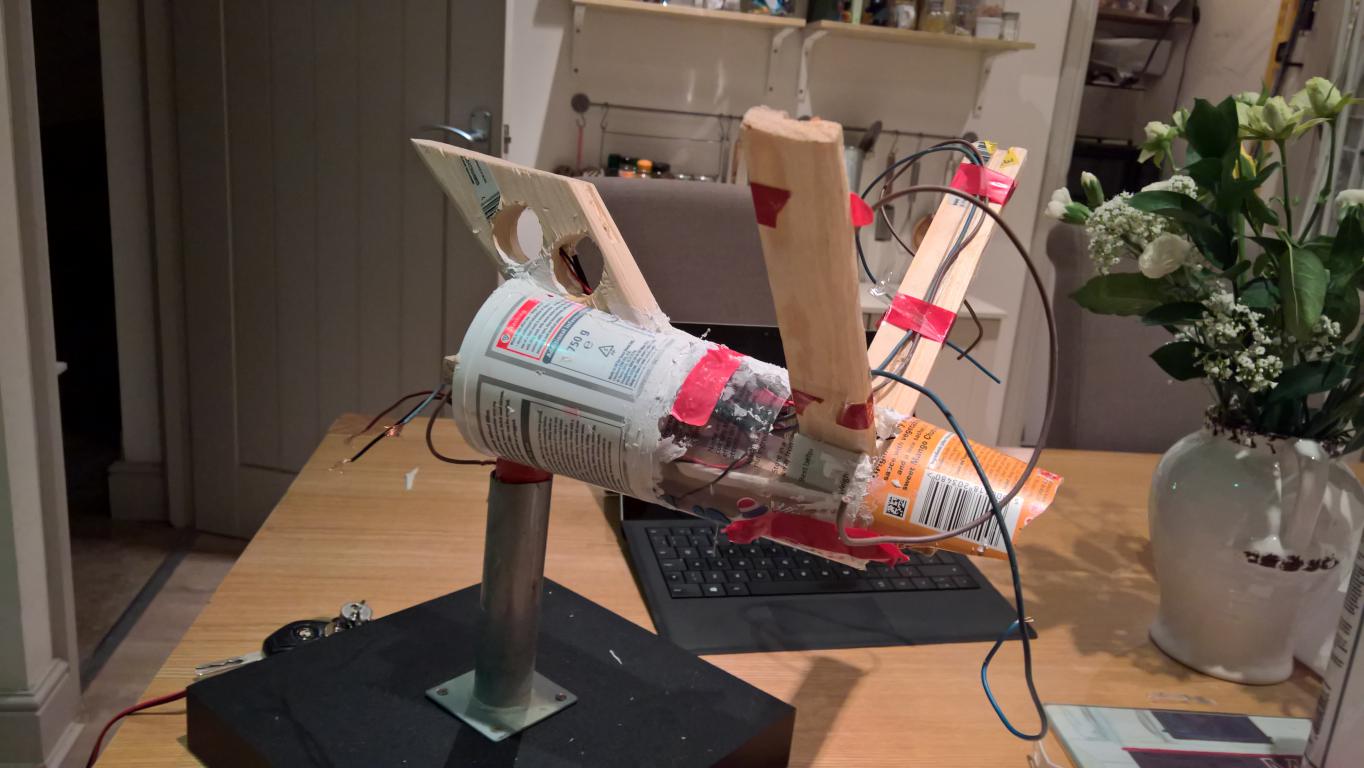
It was cased using various plastic pots, an old filler plastic tub, a candy floss plastic tub and a Pot Noodle at the end. It was a bit awkward and I had to cut and roll round, before gluing and making secure. Before this I had to thread lights through the hull at the correct places. It was exact, as once the windows were cut out, the light would shine through.
Windows were cut out using a flat head screwdriver, heated up, which simply pushed into the plastic and created a perfect window.
Once I was happy with the structure; only the warp engines to be attached, I joined the saucer to the neck of the hull. Surprisingly it was strong. I was worried that the screws would thread through the foam saucer base, but they didn’t.

The shuttle doors were created using a ping-pong ball. This was cut and primed and slottled into place.
The stand was actually a thin strip of MDF, but solid enough to hold a stand. The stand was actually a left over from my previous X-Wing model, which was narrow, but a B&Q pipe would connect and attach to the base. I eventually changed this to a floating shelf block and a table stand.
Because of the wiring it was awkward. I had a end socket under the model, which I had to cut a gap into. The stand pipe slotted over this, so I had to cut a gap in that was well, so the wires went outside the end socket, through both gaps down through the stand pipe and then threaded down and out of the back, unlike the untidy set of a 100 and 1 wires on my previous Enterprise plastic mode.
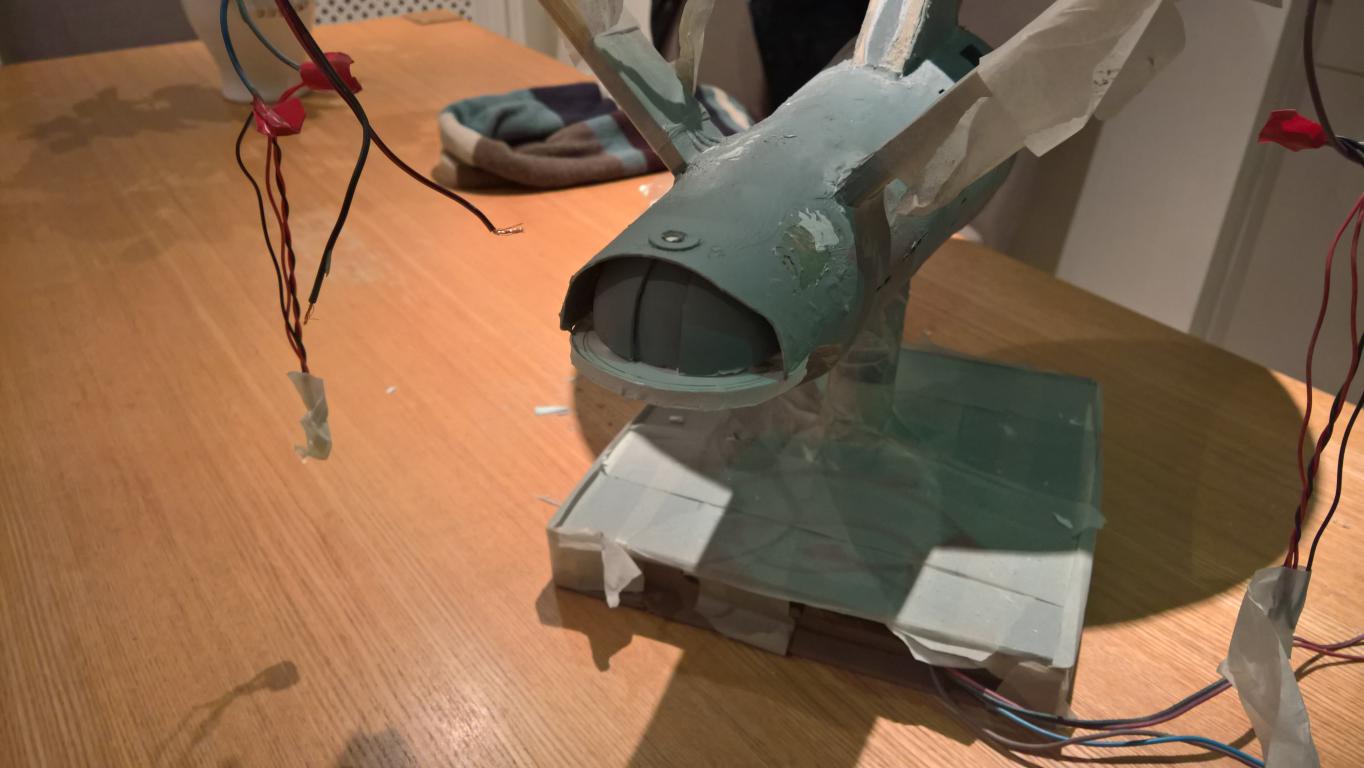
The front deflector cone was a bit awkward. I had to extend the hull a little bit and then it was a case of finding something to curve the edges into the deflector. To solve it, I found a Lego Cup from McDonald’s and then found a perfect fit lid from another plastic drinking cup, which slotted over the hull. The shape was built up by using filler and then the deflector area was added to the main hull by threading the deflector with a hold in the middle, over a metal rod from the hull. Holes were then drilled into it and then connected to the main hull. The gaps were then sealed using foam filler, which also acts as an adhesive on the insides. It wasn’t perfectly smooth, but it sufficed.
For the deflector dish, I found an Ikea suction cup cover and it was perfect size. I added washers and nuts, before screwing in a long, thin bolt for the deflector pin. This was placed into a toothpaste top and then into an aerosol top, both which were the correct size. I added foam paper to thicken the diamters out and painted it gold. This slotted perfectly into the front of the model. I then added the extra gold embellishments and also a black border to tidy things up.
I added the impulse engine and used filler to smooth around the neck, the engines, etc. I needed to prime it and then smooth out imperfections and continually prime it.
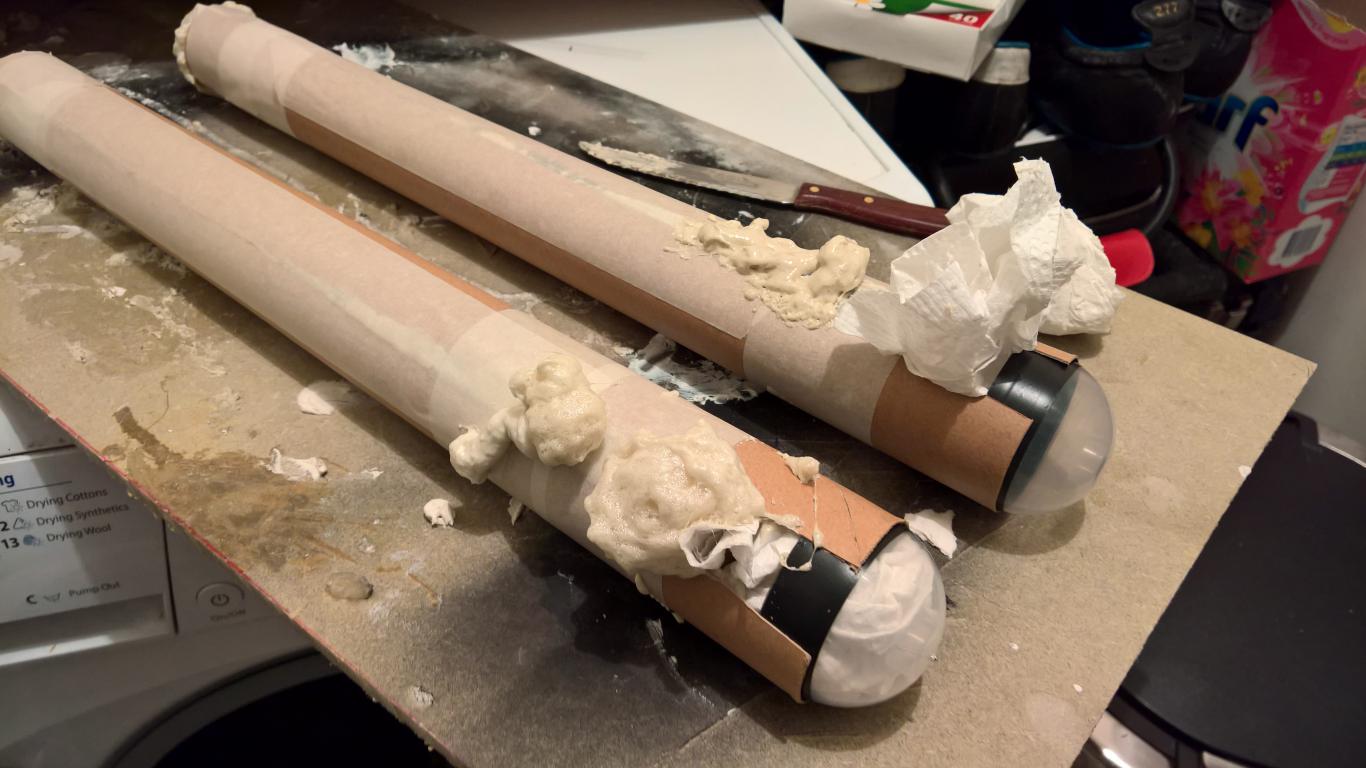
Ideally the warp engines would be a single tube, but the diameter is less at the back end as to the front end. I used long wrapping cardboard tubes and cut them on the long side. I then overlapped the shorter diameter and end filled with foam filler. The wiring was threaded through after this. I had to cut the insides out to add the recess. In hindsight, this should have been done before attaching, as my impatience got the better of me. Nevertheless, the recess was created and I cut an old desk tidy for the grill material. I gllued and pinned this in. The extra parts on the engines were sourced using an old model kit parts frame. Card was used to create the connector and straws were used to make the piping a thicker diameter. some overlapping paper was added later to tidy up the recesses.
I really wanted to create movement on the engines, so two low RPM motors were purchased from Williamofonchan on eBay. For the clear domes, I purchased two L’Oréal roll on deodorant sticks which matched the size based on the scale plans. I also purchased two egg shaped cases from Hobbycraft’s sale area, as the curved, clear parts fit inside the deodorant domes. I added lines on the egg shaped domes to match the actual mode movement. I rigged up the motors to some condiment bottle tops (yes, the remainder of the X-Wing engine bottle!) and connected to the egg shaped domes, which in turn went inside the deodorant domes. This created a spinning dome inside a done. I used a liberal amount of red insulation tape and red hobby paint, so the glow of the engines was red.
The wiring was separate. My fear was that the motor would clap out once in, so at least the lighting would continue working. The extra wires went via a switch.
Details were added on regular intervals, including a fin to the back of the saucer, flat edging outside the hull, additions to the warp engines. The back of the warp engines was done by wrapping corrugated paper around an old foam tube left over from the warp engine filler. This was then cut in a curved shape before using two plastic costume jewellery marbles and pushing them into the foam.
I always primed the model on regular intervals to smooth the lines. I used pound shop primer and went through a few cans. Eventually, I prepared to finish it off. I template it using standard masking tape, creating blocks and shapes. I sprayed primer liberally, so it created shapes, which when reflected, would look like panels. For the spray finish I tried Light Rain Satin from B&Q. This was too bright and then I opted for Wilko’s primer, which was very cheap. The colour was near perfect, but I then dusted it with Light Rain to achieve the finish. I added pencil lines here and there to give the panelling more prominence.
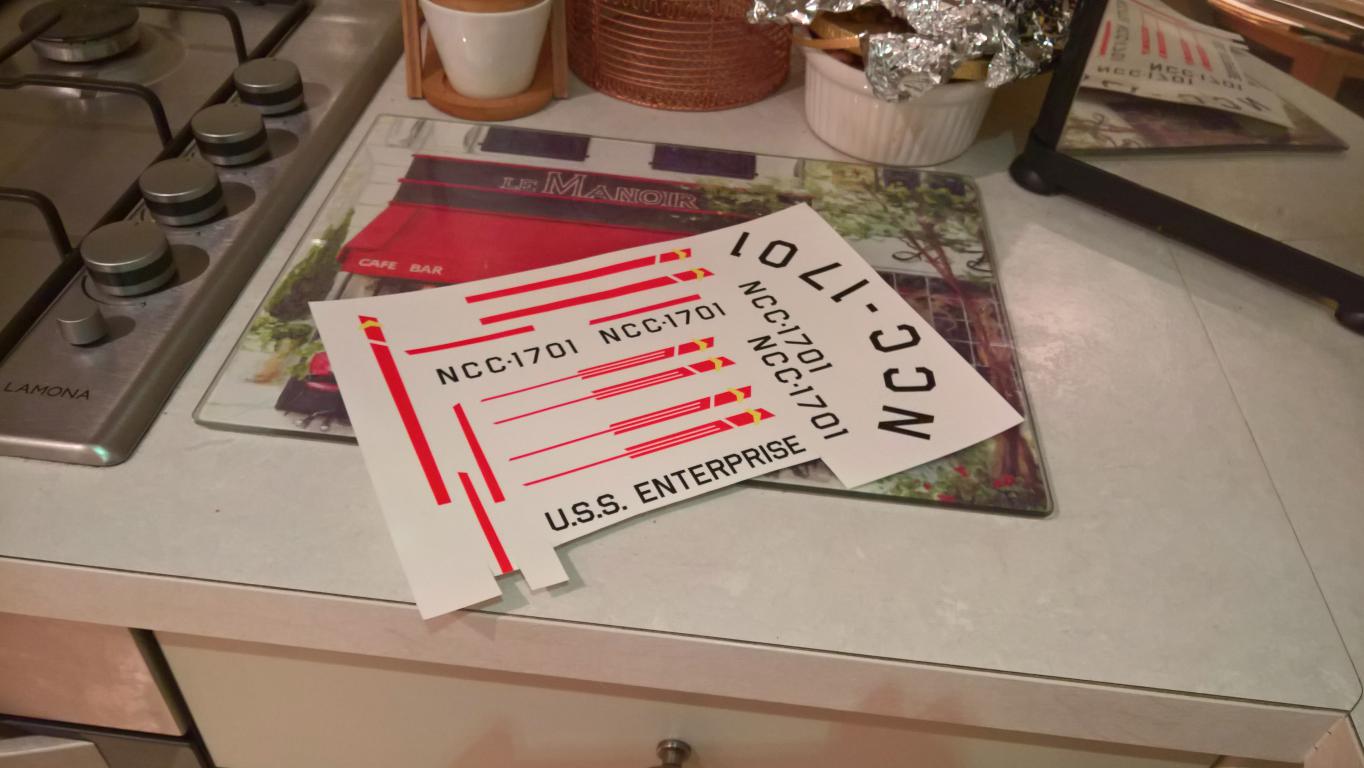
The decals were shockingly easy. I purchased five sheets from Craftovator on eBay I recreated some based on some I found onlne, using a matching font and creating basic shapes. These were printed on decal paper, before being lacquered. Once dry, they were cut like normal decals and applied. It was easy and easy to adjust.
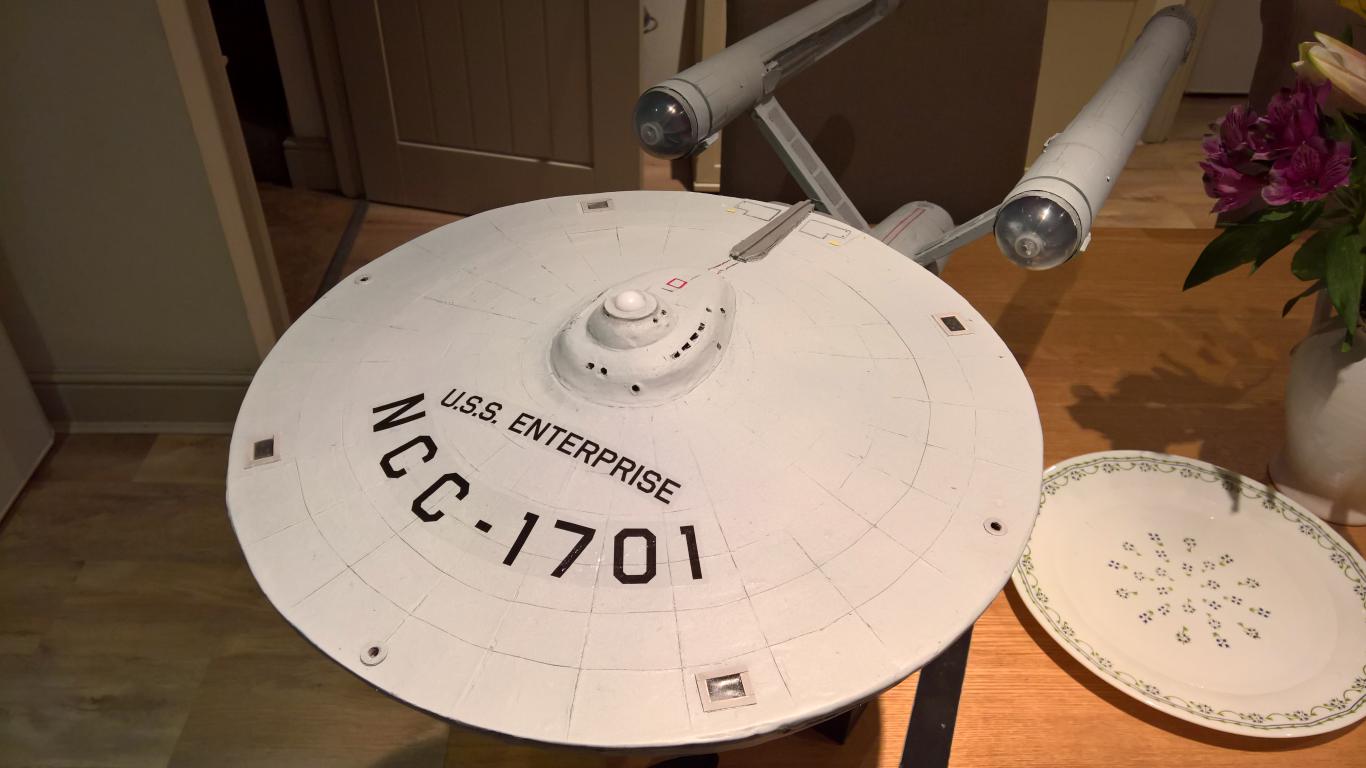
I then sprayed the model with laquer to give it a subtle sheen. I still need to add the fins to the back of the warp engines, as well as detail on the hull and a few more decals or lines. I’m also currently sourcing a decent power supply connector, creating a male and female connection, which is easy to switch on and off, but all in all, I’m very pleased with it!