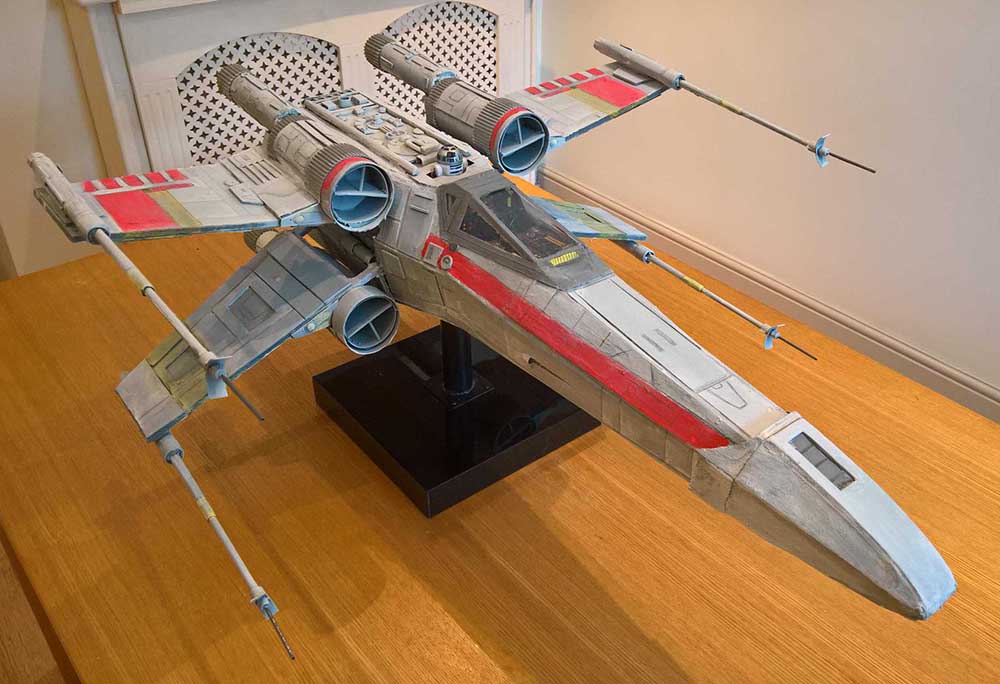
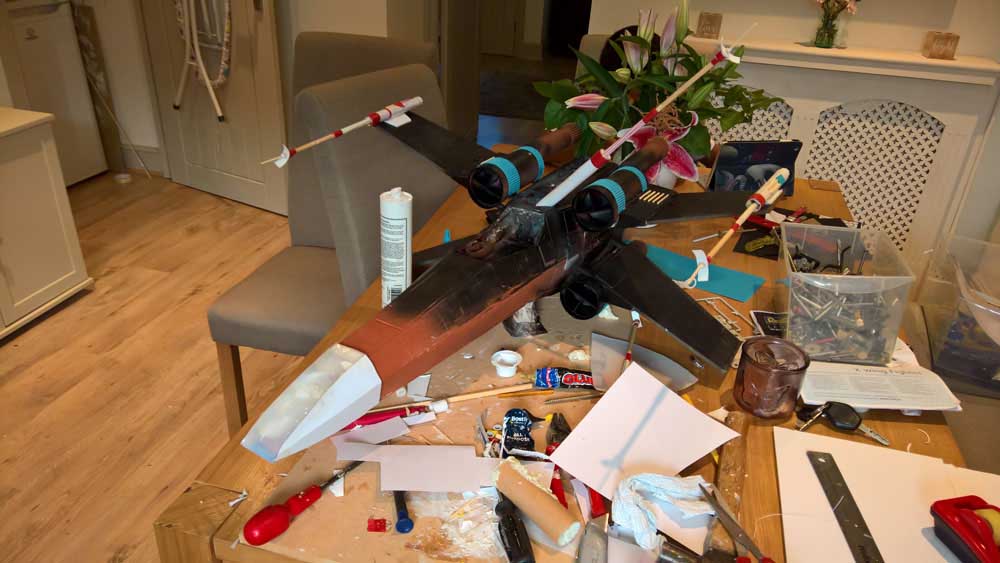
This article shows my Star Wars X-Wing fighter model, which was scratch built using a variety of simple materials. It isn’t physically exact to the genuine movie model, but seems visually close enough. Finally, this year, in July, I started prep on it and completed it in October 2016; building on available days and any other spare hours available.
The pictures in the gallery below show when I converted it to a “garage” diorama, as the wings started to collapse and it was the best way to salvage it. This also helped in solving the anatomical incorrectness.
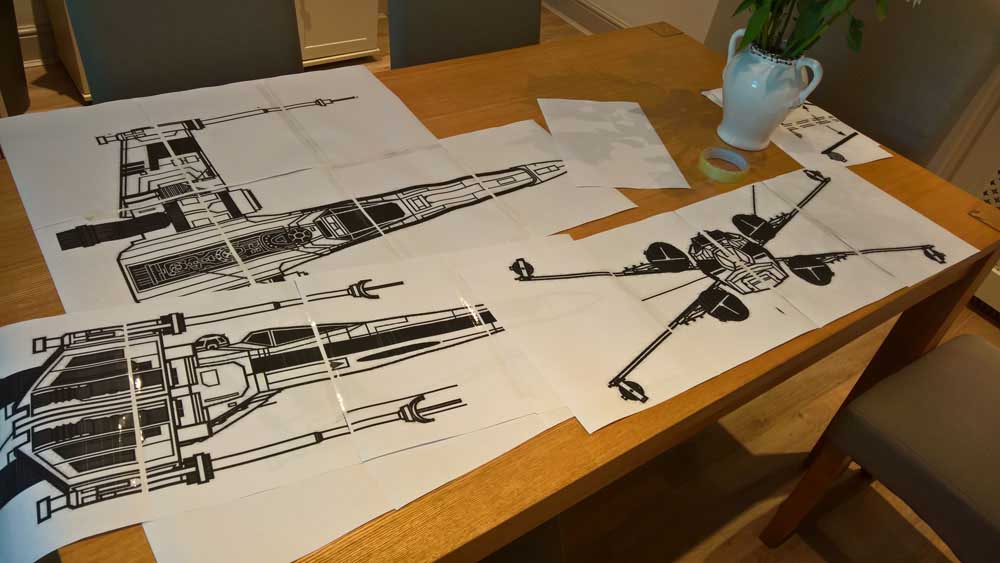
I printed out the plans to scale in size on normal A4, but used Adobe Illustrator to print them out tiled and joined together. It soon became clear that I was never going to get the exact detail match to the movie model, so I didn’t lose sleep over it. The length was to be 890mm by around 670mm wide, so just under a metre in length.
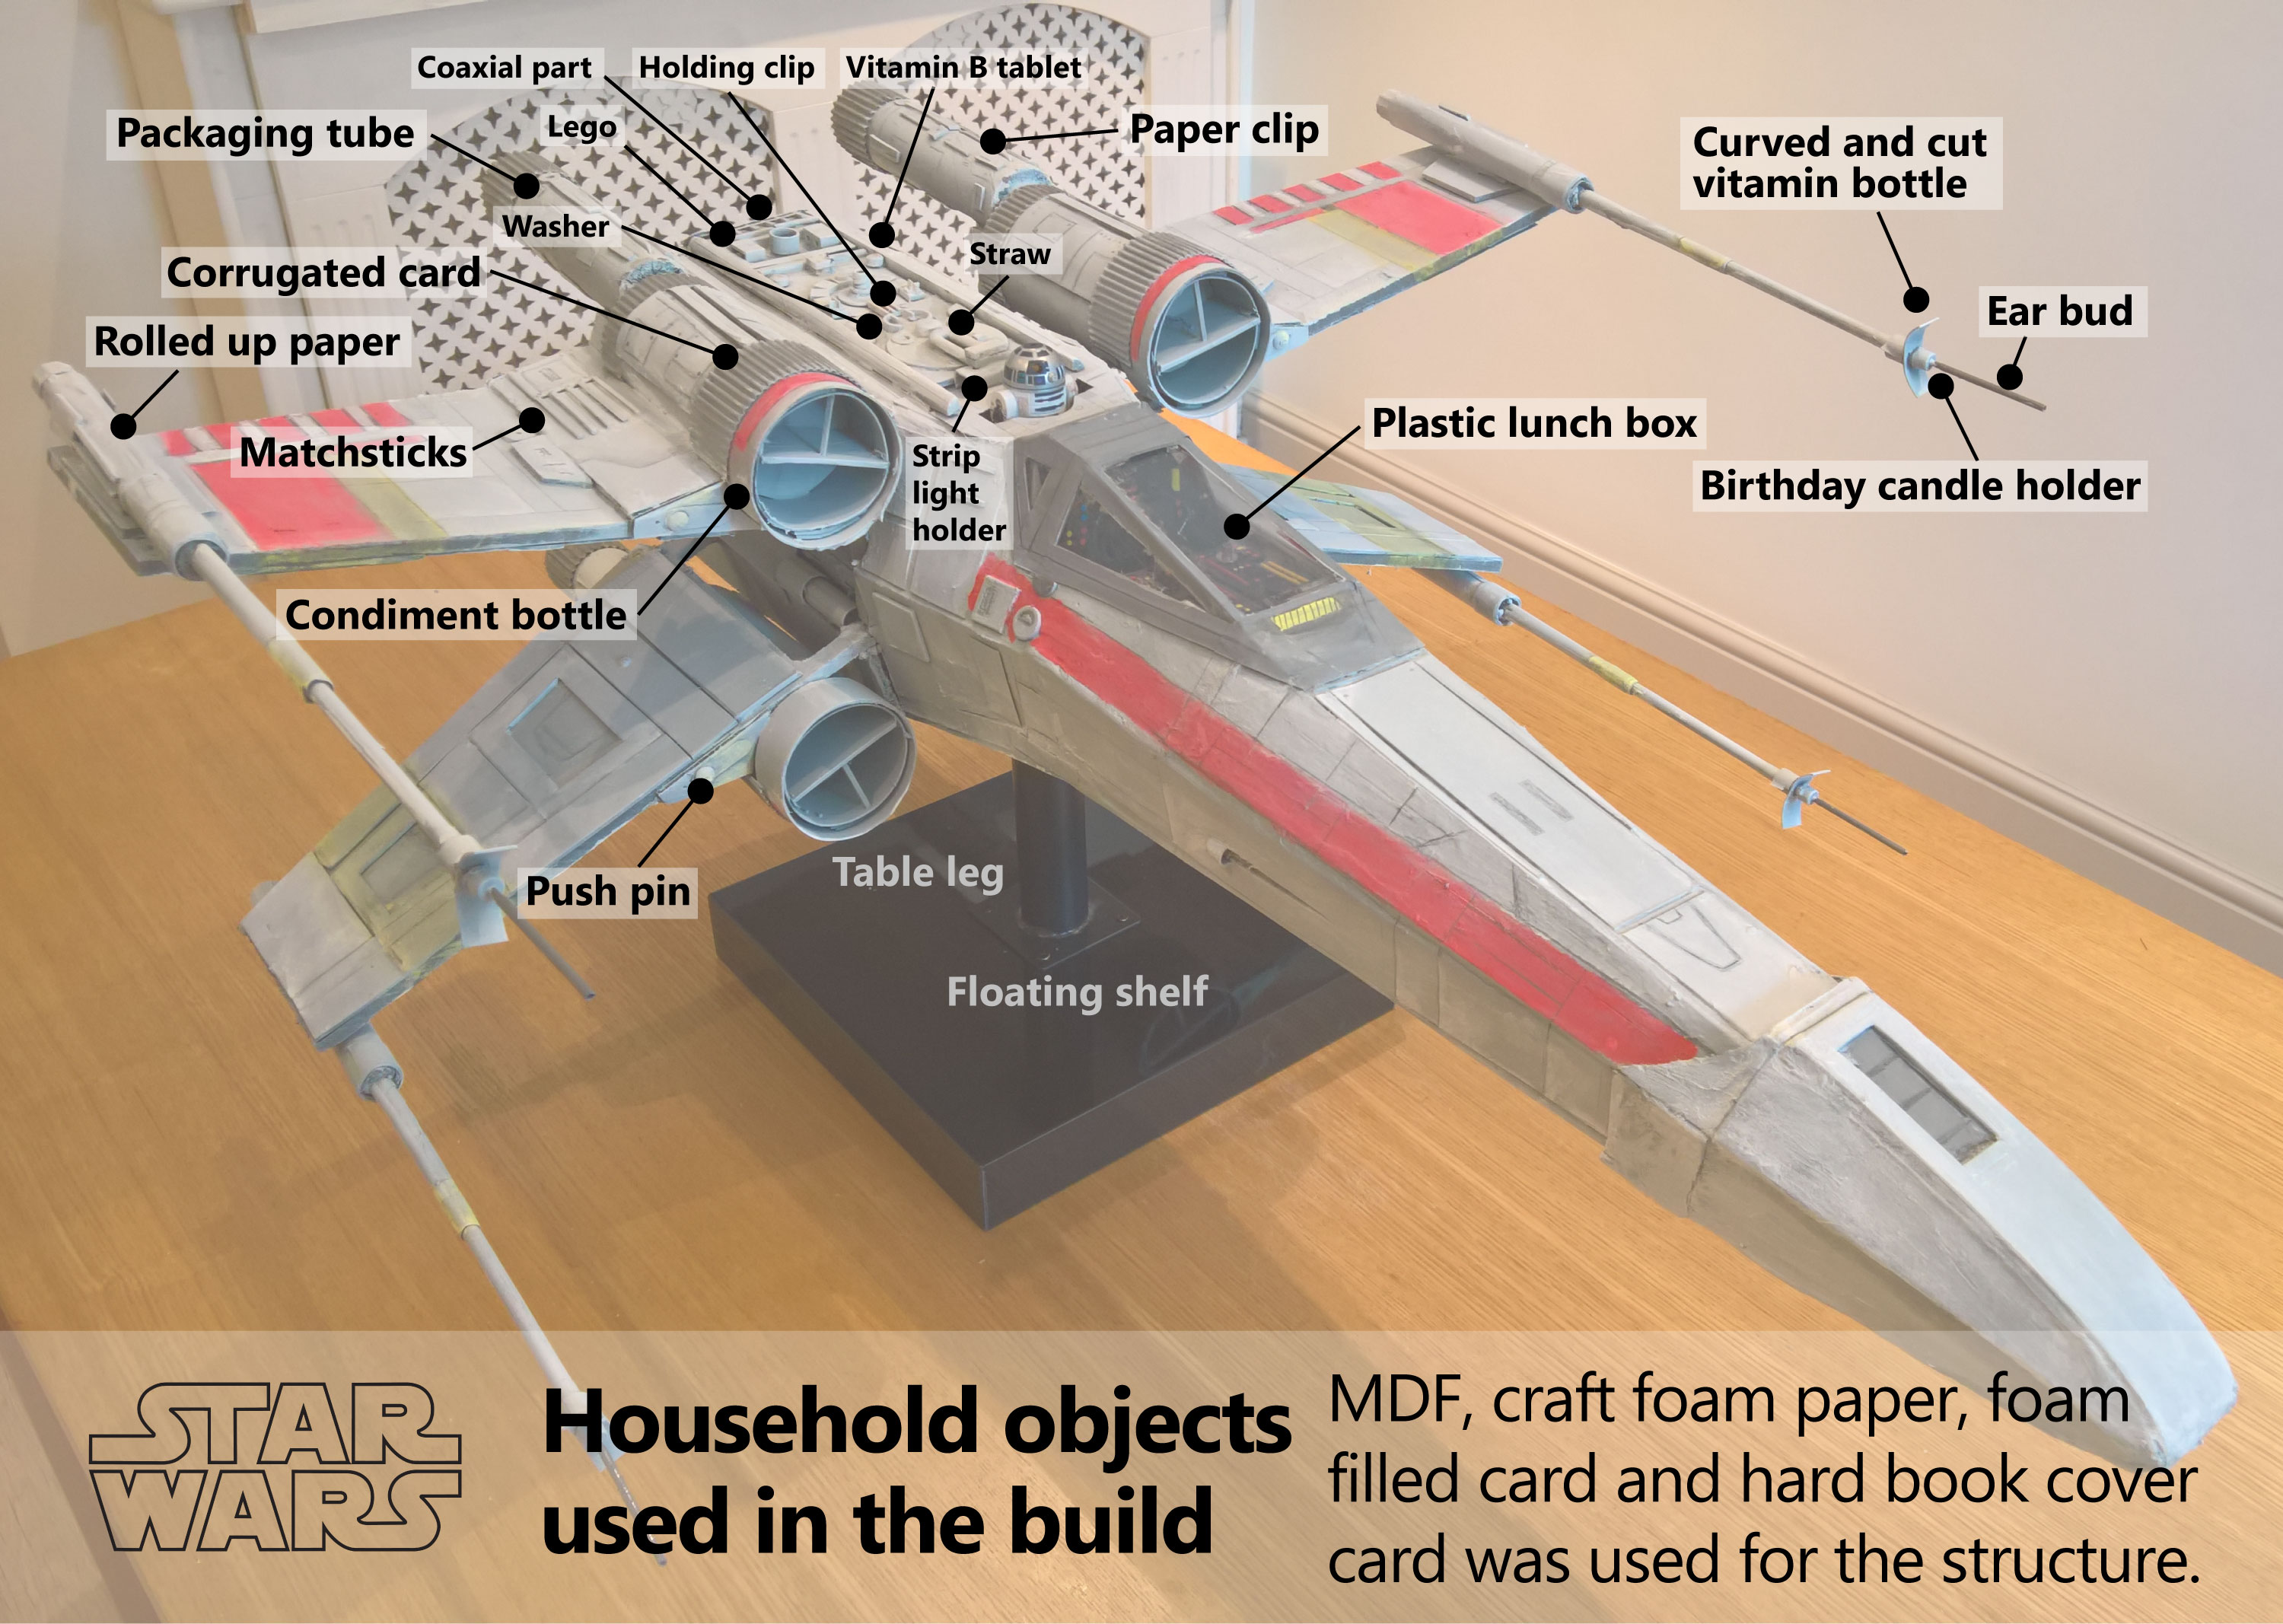
By the time my little, mini Revell X Wing model arrived, I had already built the structure by visually measuring and cutting the shape. I used MDF for the main structure and some of the panels, before cutting up an old hard cover book to use on the side panels.
One of the most important things added was the stand. As the X foils would be hanging free. I remember having major issues with a stand for my USS Enterprise model, so with this being much heavier, it had to be sturdy. I used the B&Q table stand sockets on the model itself, screwed just under the droid position and then a simple B&Q post which was 200mm high, which keeps it secure while I’m working on it.
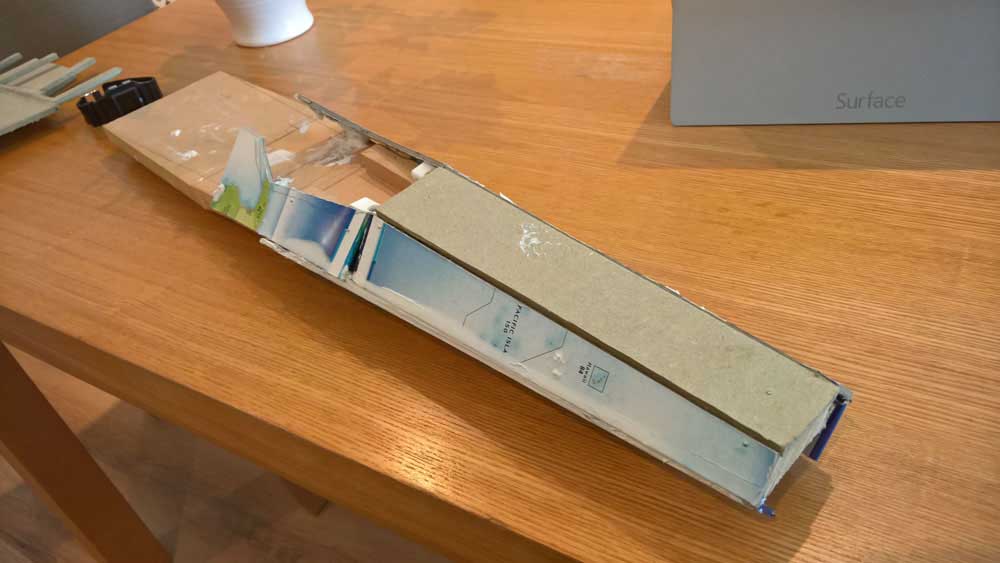
The foils were cut in thin MDF. But once my little guide model arrived, it was clear that the way they attached to the body was incorrect. I didn’t change this as visually, the plan was to add some shadow painting and illusion to give the impression the side of the ship had some depth.

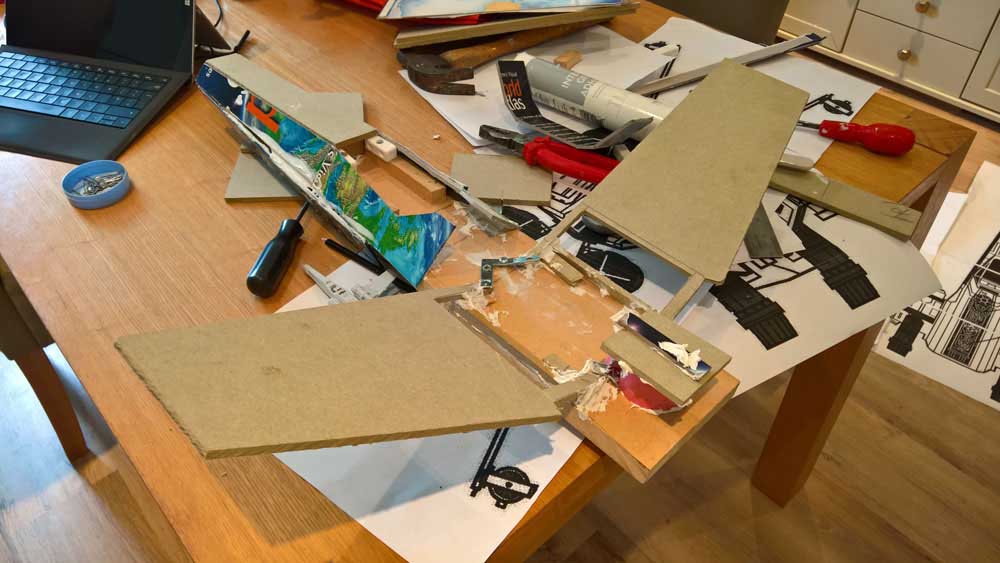
Attaching the foils was surprisingly easy. I used small B&Q L panels, which usually join kitchen cupboards, to secure them to the body, with angled blocks and grab adhesive glue from Tesco, which hardens well.
Once done, the body was covered. I did this initially before the wings by cutting the shape, making sure the cockpit shape was there. I later had to adjust as the angle was too small. I increased this easily. The chopping and changing was okay, because it makes the model more robust. All the panels were hard glued on with grab adhesive, but also pinned on with simple clothing pins.
In hindsight, I would have worked extensively on the skeleton, making it more symmetrical and secure before adding panels. I added foam filler inside the back end of the model to add some lightweight filler to hold the panels in. I had to make some adjustments once dry, as it warped, but still was easily rectified. By this time, I abandoned the exactness of trying to match a real life model. The foils themselves, especially on the inside were incorrect, but visually it looked close. I was going to use panelling to give the impression it was close to the exact model. The cockpit height was ensured by adding a few blocks and then building panels around it.
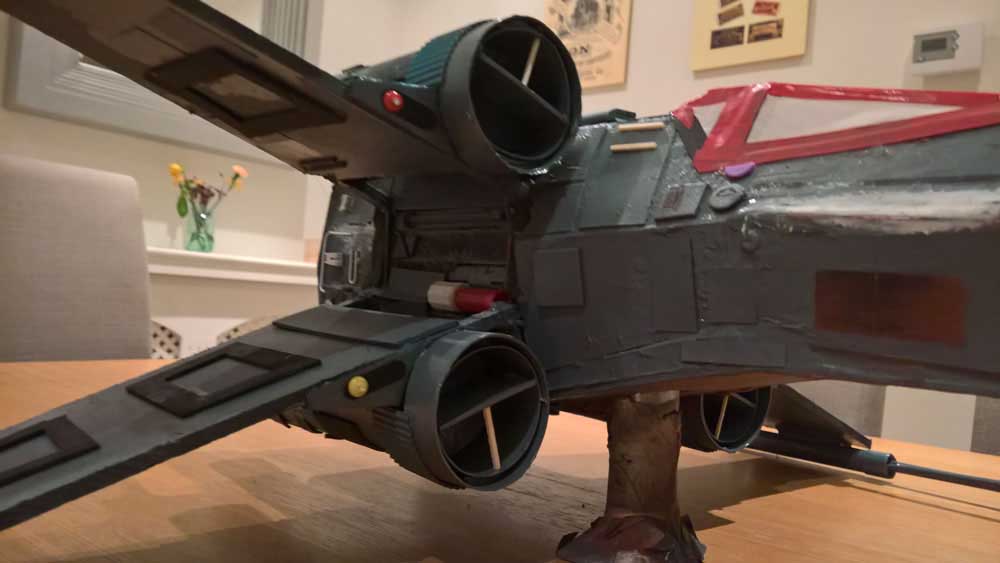
The engine nacelles were a case of looking at my printed plans and finding something similar, but being very lightweight. I found four sauce squeeze bottles (which I had from our Wedding party!) and cut them to size. I then used foam filler to make them secure, but light. For the exhaust I used wrapping paper tube, which I measured visually. I filled the entire tube with foam filler and then cut to size. I attached to the engine nacelles using stick pins through both, lots of glue and also a temporary stand under it. I used some Tesco glue, which was outstanding.

I then started on some details. I started with the top, and genuinely kit bashed the entire top using Lego, sticks, coaxial parts, straws, tablets (yes, vitamin tablets), as well as various plastic bits. It wasn’t exact, but it was done using a 3D guide of an X-Wing found online. Also, the sides were raised with quadrant moulding wood (from B&Q), rather than the detail being sunk.
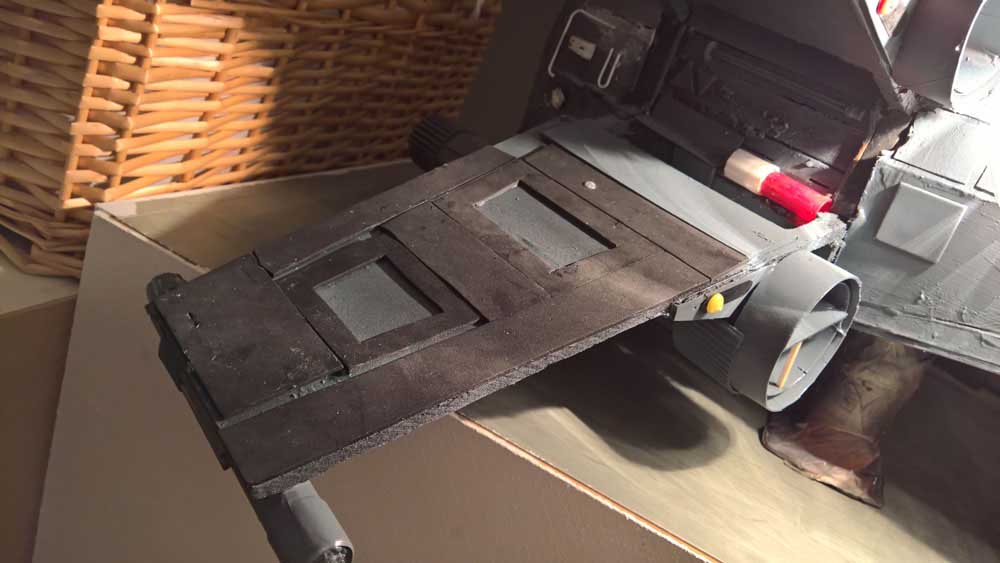
I created the back door separately, using foam board, with kit bashed items around to try and match the exact model. It was recessed over another panel which was pinned to the back of he model. I used quadrant moulding wood to border it to give it a more recessed appearance.
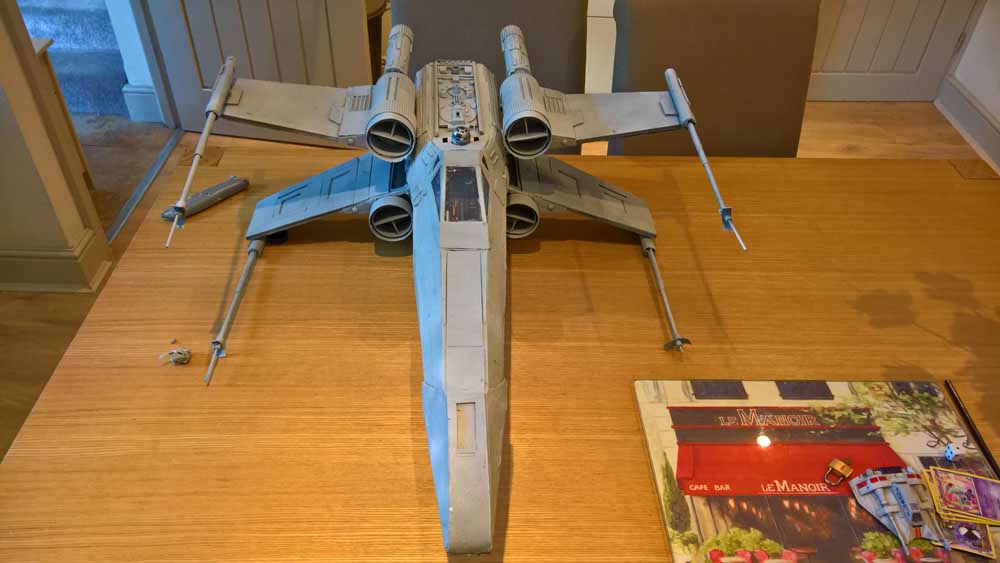
It was then primed with some terracotta matt spray paint I found lying around.
Lasers needed to be lightweight, so instead of finding a tube, I rolled some card and filled with foam. I used dowel moulding from B&Q to thread through; again, using a visual size guide. While the foam dried, I positioned them so they were in the middle. I used cut straws and normal insulation tape to add some diameter to the front area. I used a curved tablet bottle, cut to strips for the curved laser cover.
For the lasers, after trying to glue matchsticks to the end and failing, I found some birthday candle holders, glued them on and then slipped ear buds, with the ends cut over them. I finished the back of the laser cannon off with an old glue tube top, cut in four pieces. Meanwhile, I added some more primer, this time black. The lasers were attached to the wings via a small triangular foam board, which was glued and pinned. They dropped off now and then, but were secured more each time, with more glue and pins.
I left the nose cone out of the initial build, so now was the time to add it. I used some remaining book cover card and small light plastic bits to build a skeleton, but the outer area was created using normal card, then added craft foam paper; pinning into the front end. Lots of glue and then normal decorators caulk was added to smooth bits and cover cracks.
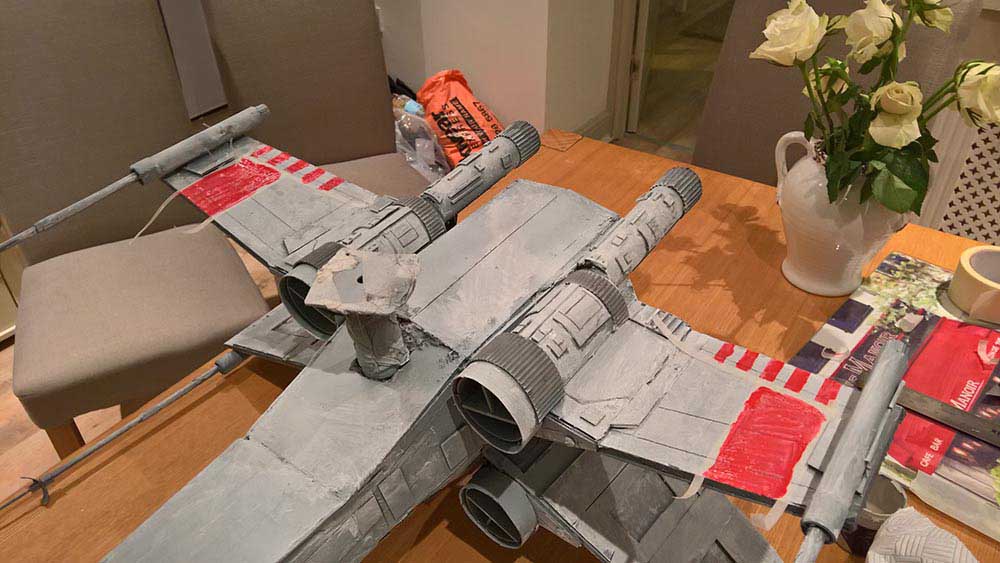
At this stage, I noticed that the foils were way to high on either side. I managed to reduce the height so it looked more closer to the dimensions of the movie version by gouging out some of the filler holding the wings, as well as shoving match sticks in to move and hold into position. I expected to have to snap them and fix them in place with metal L or T panels, but surprisingly, they dropped to the correct height and remained sturdy.
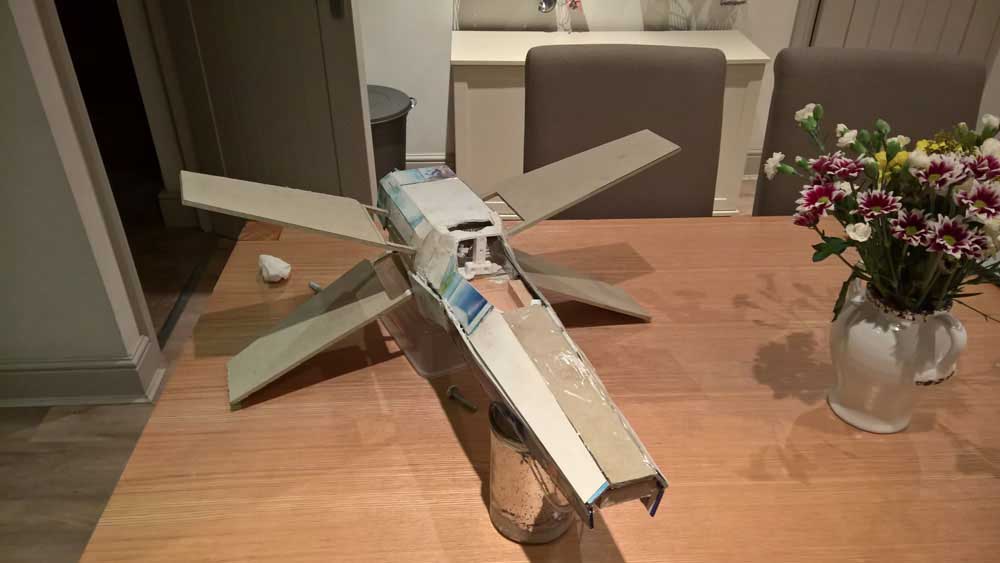
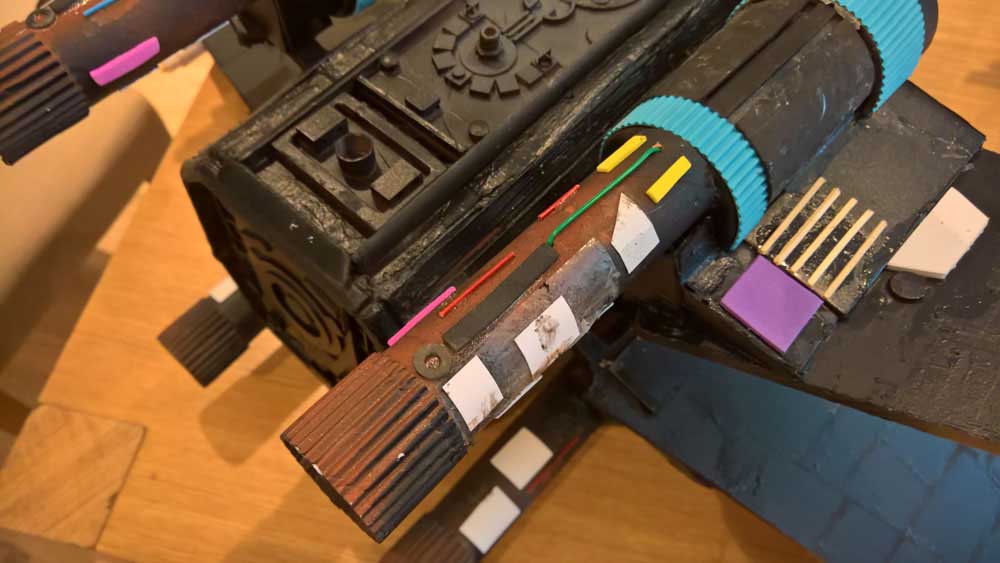
Now it was time for panelling and detailing. I used the soft foam sheets available from the likes of Hobby Craft and Tesco and cut and glued them on. I used a rough guide to the exact model, but added my own ideas in. I also used various other materials such as matchsticks and other plastic bits. The nacelles were detailed using corrugated card (from Hobby Craft), curved over. The exhaust end was four bottle tops glued into the card tube.
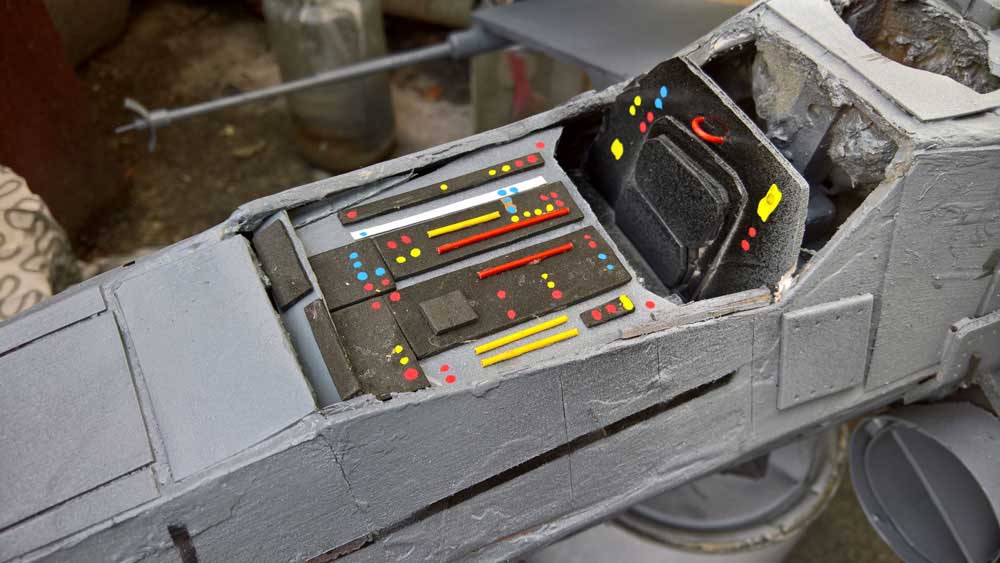
For the cockpit, it was awkward as the shape wasn’t entirely symmetrical. I purchased a £1 plastic container (from the £1 shop no less). I cut the side windows shape and the top window shape. I then built a “scaffolding” inside the cockpit to hold in place. This didn’t really work, so I made the windows perfectly symmetrical, used sellotape to attach, then stripes of insulation tape to simulate the joins. I had to cut around the cockpit to make it fit. It wasn’t perfect, and the length of the window was a bit short in comparison to the exact model, but I was content with it.
My plan was to tint the window to avoid making out the cockpit. But then I thought sod it and quickly built the cockpit out of foam filled card, and detailed it.
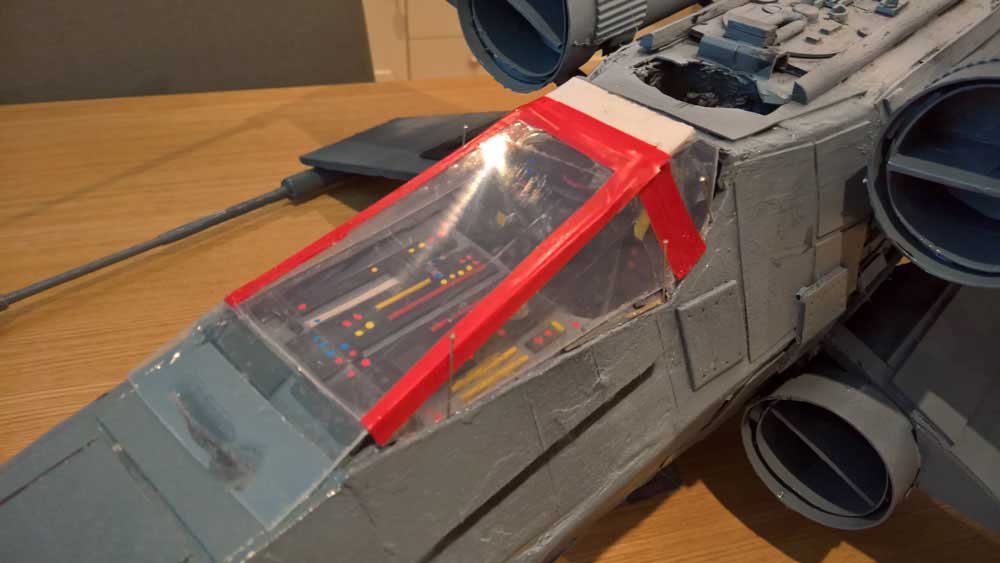
I then placed the glass structure over it. It didn’t fit, but I used strong Araldite glue to join. I then pinned it and left it to dry. Once dry, I added the edging with black card, before covering the edging with insulation tape and normal glue to seal it. I masked the windows with masking tape in preparation for the final spray paint.
Don’t forget the droid! My youngster had a couple of R2 toys, but the sizing didn’t seem correct, so the plan was to buy one off eBay, or create a compatible droid. However, the original toy R2 unit seemed to fit well in the end, albeit being a little smaller. I built the housing around it using normal card and pinned and glued it in before priming.
More panelling on the foil, In between I had used cheap £1 shop primer to spray the entire model. This was done on a regular basis, as once primed you notice what looks untidy. I used a template on the foils, as in cutting out a shape of the foil on card, cutting out panels, placing it on the foils, then heavily spray painting it and removing the template, giving an extra layer of paint in the exposed parts, which give the feeling of depth. This didn’t work as well as I wanted it to, but by this time, the model contained plenty of panelling courtesy of cut pieces of card added here and there.
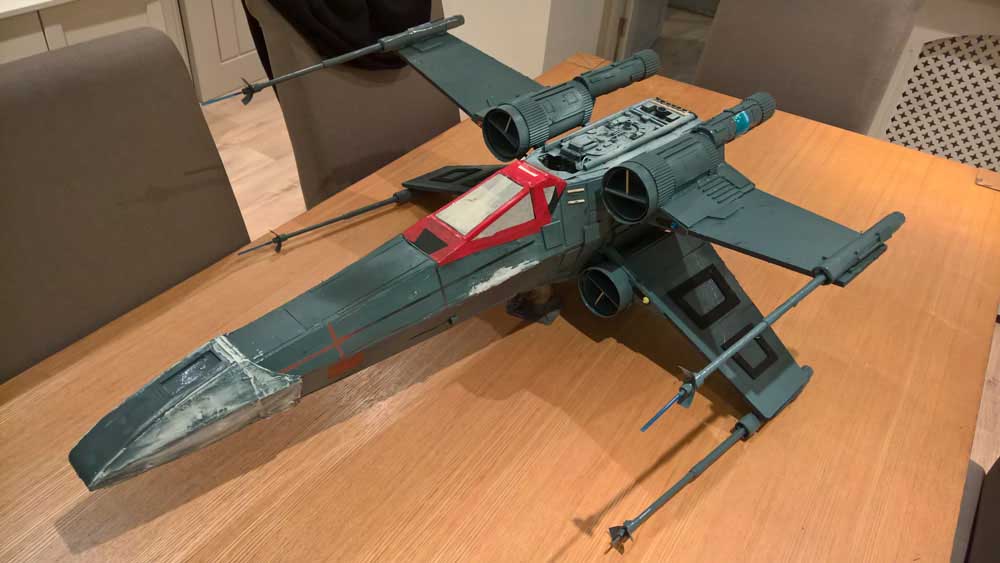
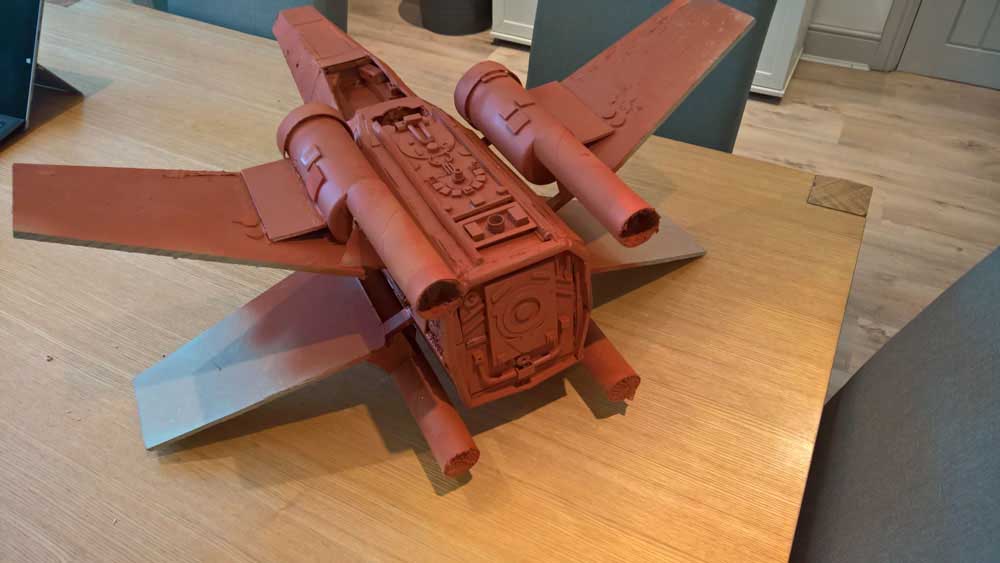
At this stage, I was getting impatient and decided that it was ready for a final primer and finished colour. I used the £1 shop primer to cover the detail recently added, before using the more expensive and better quality Plastikote primer. I then lightly sprayed white matt over the grey, to brighten the structure. Great thing about Star Wars is that everything looks battle worn, which allows me to get away with a few things.
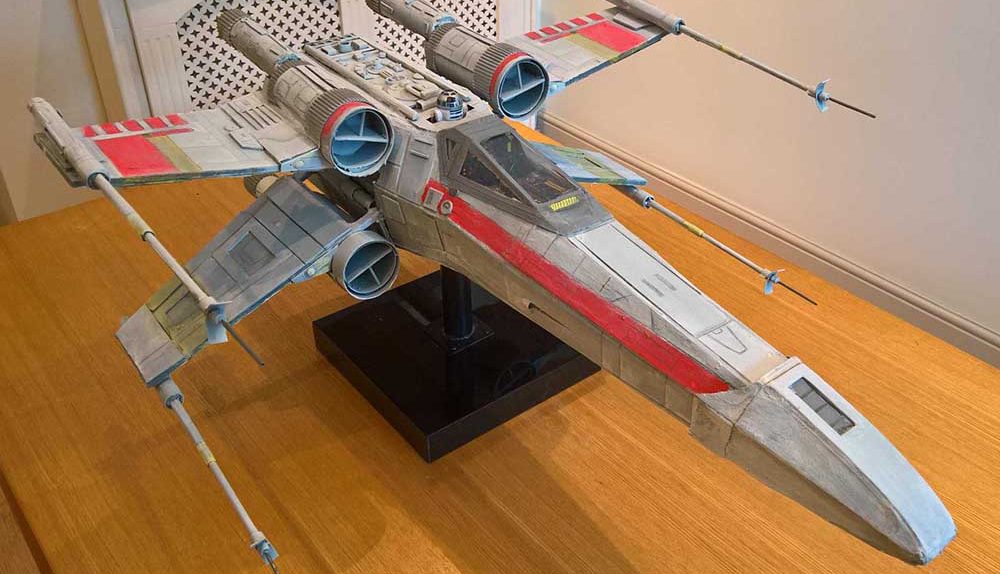
The bit I enjoyed was the detailing after spraying. I used normal Tesco craft acrylic paint, but washed down to add the red colour on the panels. I masked the area to get a good finish. I then used darker grey paint, brushed on to areas like the cockpit and corrugated areas around the nacelles. The model was a bit too dark grey, so I added white and dry brushed it in to brighten the model a bit more.
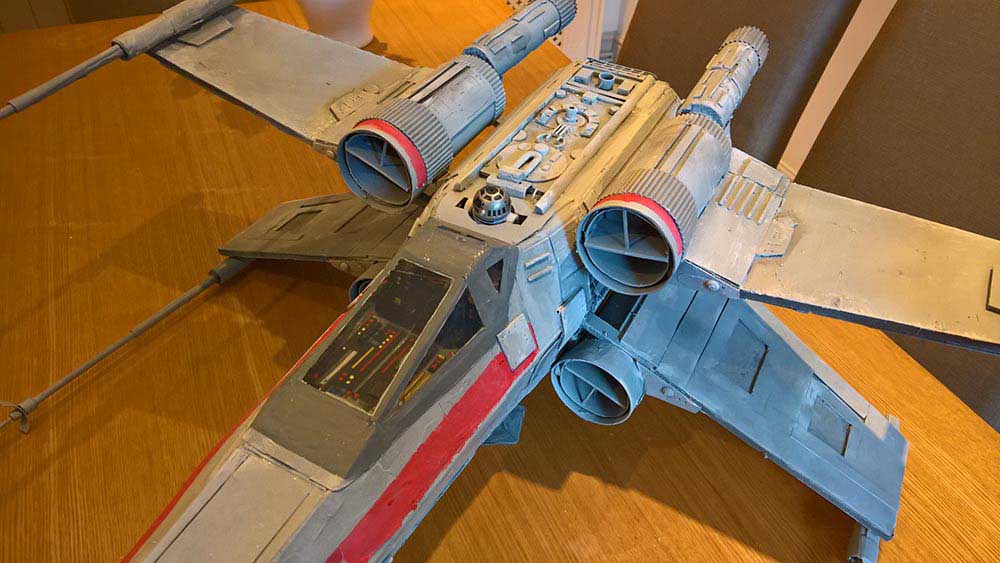
The underside had been neglected, so I spent a bit of time on that and started the red paint work on the x-foils using masking paper and a washed out red and white mix. Pencil lines were added in to various areas to bring out some existing panels and giving the illusion of panels.
Much more detail was added to the top of the model, as that’s the area which is seen the most.
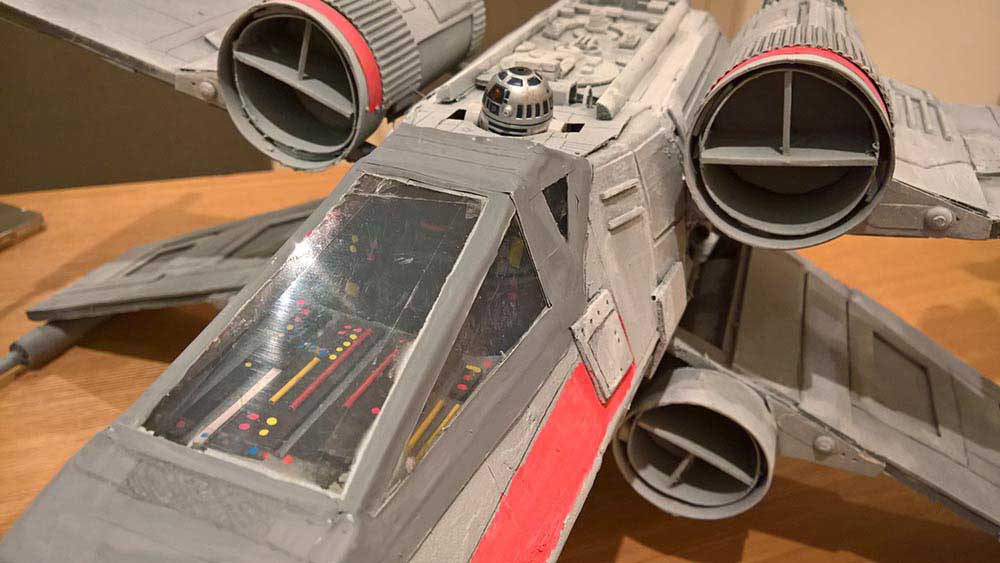
Finally, the yellow washed paint was added to various areas and the model is just about complete.
I still need to concentrate on the top x-foil undersides, as they need a bit more detail, as well as a bit TLC on the laser cannons. I wasn’t sure about the colouring, so I masked a few areas and gave it a light coat of white, spraying from a distance. I was happy with the result. The yellow panels came out a bit too yellow, so I brushed down with a damp brush to take out some of the bright colour. I’m quite pleased with it. Turned out a bit better than I expected.